The Brief
Use a combination of quality, contrast, direction and colour to light an object in oder to reveal its form. For this exercise, we recommend a natural or organic object such as an egg or stone rather than a man-made object. Man-made or cultural artefacts can be fascinating to light but they’re already authored to some degree, which requires interpretation by the photographer: this exercise is just about controlling the light to reveal form.
Introduction
The further instructions for this exercise discuss how a simple, organic subject can be photographed with an equally simple ‘studio’ arrangement and selection of light source. Over the years, I have enjoyed shooting in a studio environment and am still in the process of building my own at home. The idea of being able to completely control the environment and concentrating what I see in the subject has always appealed to me, even though I have enjoyed spending long periods of time outside, shooting nature in uncontrollable natural light. I believe the appeal stems from me not being a patient person; waiting for the perfect conditions to present themselves often causes me some challenges. Studio work offers the ability to adapt quickly to something in the subject frees the photographer from the environmental elements. Knowing that I have lots of studio equipment that could be used for this exercise, and the space to set some form of studio up, was reassuring. However, the idea of keeping everything really simple made this exercise more interesting and in the end more rewarding.
The Subject
A recent weekend in Weymouth training for an upcoming swimming event, offered me plenty of interesting objects to chose from; a variety of textured pebbles, pieces of driftwood and shells. After collecting a number of samples, I settled on the one shown below.


The shell has interesting textures but little in terms of colour variation, which I thought would make revealing it’s details more of a challenge both from a technical and artistic perspective.
The Setup
The first thing I wanted to decide upon was the type of shot I wanted to take for this series. The options included high key, which traditionally uses a strong key light on the subject and a lit white background and low key, where the background is either black or a dark texture that doesn’t reflect light. An example of both that I shot during an art nude workshop can be seen below.
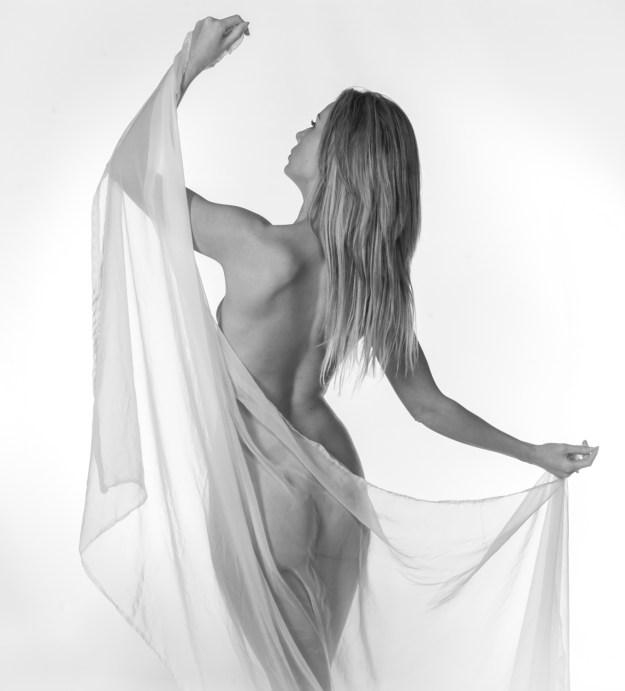
Example of high key lighting where the background and the model are lit
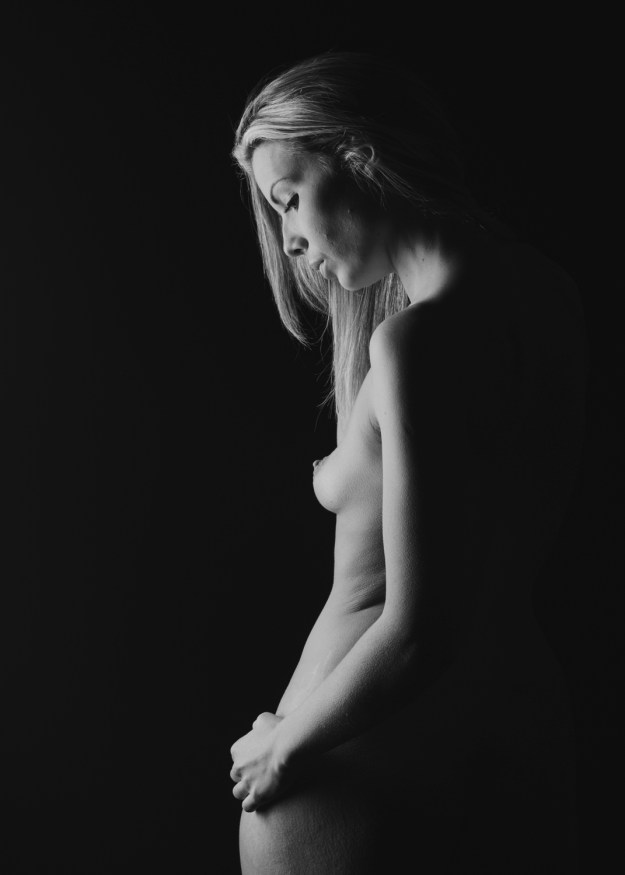
Example of low key lighting where the model is lit against a dark background.
The simpler of the two setups is low key, being achieved with with minimal lighting. I elected to use a piece of cardboard in an ‘infinity curve’ as described in the notes. By curving the cardboard from the vertical to horizontal plane, there is no perceived join in the between the planes, making the background appear continuous. If depth of field is set correctly and the light is at a level where it rolls off just behind the subje
ct, the card appears to be completely black. My simple rig is shown below.
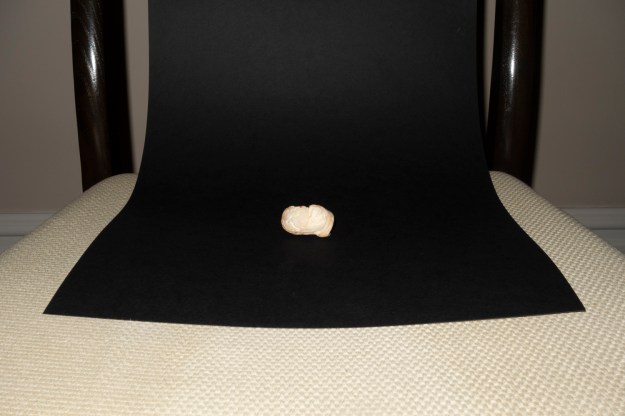
Infinity curve achieved by black card on a chair. The height of the chair allowed complete freedom to move the light around the shell
For light, I turned to my continuous LED light by Manfrotto. This small light array can be adjusted to three levels, is very lightweight for hand-holding and has a tripod socket. The illumination is at a colour temperature of 5600K, which is somewhere between natural daylight and overcast sky. I fitted the LED to a lighting stand to keep the illumination consistent for this shoot. Other equipment included another small LED torch, my mobile phone, tripod for the camera and a cable shutter release.
The brief was to take different photographs of the subject by varying either the light or perspective. As my subject was quite small, I wanted to the shots to be close enough to reveal the details of the shell fully in the frame. For this reason, I selected my 200mm f/4 macro lens, which creates a surreal look that I’ve used elsewhere on this course.
The Shoot
With the setup complete, I thought about all of the things that I found interesting about the shell. The creature that had lived in it had shaped the interior with a strange texture in amongst the smoothness of the surface. The outside of the shell was fairly featureless and polished smoothly by the sea and its time on the beach. Opposite the main opening, there was a large hole or split that offered another view into the structure, while the shell thickness varied across its surface. When I held it up to the sky, it was clear that the shell wasn’t completely opaque.
The shell was placed on the card and the composition set so that the shell was in the centre of the frame. The extremely shallow depth of focus of the macro lens meant that I would be changing both the light position and the point of focus to create my images.
The Images

Shell 1 (3s at f/32, ISO100)
Shell 1 – The light was set to the right of the subject at a similar height. For this image, I was inspired by the 50th anniversary of the lunar landing, which was the previous day. The smooth external face of the shell and its twisted shape against the deep black background reminded me of a celestial body like an asteroid.
Shell 2 (5s at f/40, ISO100)
For Shell 2, I put two strips of black tape across the front of the light to create a slot for the light to pass through. Making the light more directional meant that I could control the way it rolls off the subject as there was now a hard edge to the source. Studios and film sets often use ‘barn doors’ on lights; panels that can be moved in and out to effectively steer the way the light is projected. My simple arrangement had a similar effect. With this image I was trying to emphasis the space in the shell where the creature once lived. The darkness of the back wall reminded me of an entrance to a cave.
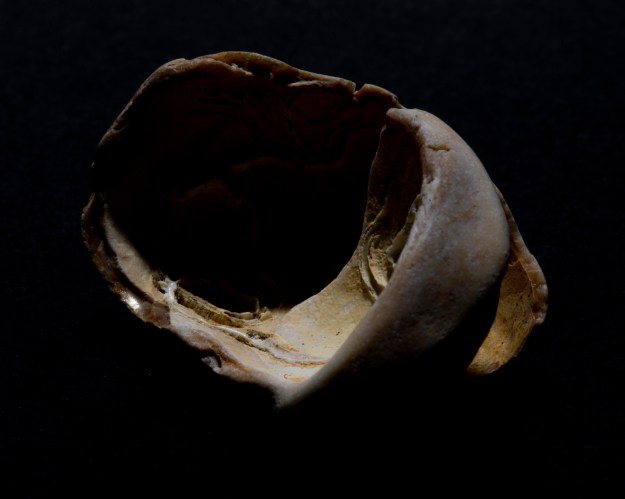
Shell 3 (20s at f/40, ISO100)
Shell 3 was the same composition, but this time I was interested in the detail on the far wall of the shell. The hole to the right offered a way of illuminating the wall without lighting the rest of the shell. The light was moved to the right and further away from the subject so that it’s intensity was reduced. Experimenting with the exact position and angle, revealed the details I was after. To me, the back wall looks like a cave painting of a woman running.

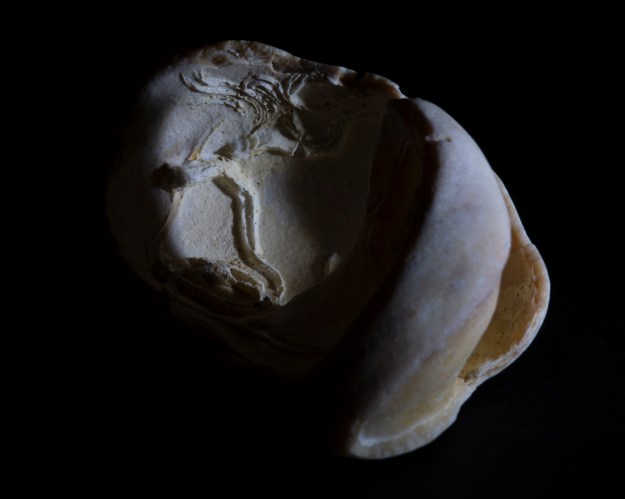
Shell 4 (20s at f/40, ISO100)
Shell 4 was the result of looking at the jagged edge of the shell. This was presumably where the other half of the shell would have been attached. I was drawn to the jagged edge along the top, which reminded me of crooked teeth. I refocussed to pick out the top edge and positioned the light to the left of the subject. As the setup was on a chair, I was able to lift the light from below the subject to the point where it just caught the top of the feature. I was surprised at how subtly the light rolls off onto the rest of the subject, which emphasised the thought I’d had when I looked at the jagged edge. This picture looks like to me like a huge fish mouth coming out of the darkness.

Shell 5 (20s at f/40, ISO 100)
For Shell 5, I wanted to exploit the thickness of the wall of the shell. This time, I positioned my mobile phone underneath the shell to light through it. The phone torch doesn’t have any control over it but the source is quite small. I first punched a hole in the cardboard to eliminate stray light, but unfortunately wasn’t able to prevent spillage from underneath as the shell wasn’t perfectly flat. I solved the problem by using a small square of cloth, with a hold punched through it, between the cardboard and the shell. I could now push the folds of the cloth into the spaces where the light was spilling out. I adjusted the angle of the shell to the camera slightly so that the warm glow of the source could be seen. This photograph gives the impression of a cave, with its wall painting as in Shell 3 and a fire burning inside. To remind the viewer that it was still the original shell, I lit the outer surface with the LED torch, which was a much weaker light to the phone. The long exposure meant that the position or stillness of the handheld torch had little impact on the overall image.
Conclusion
This exercise was very rewarding as it pointed to the simplicity of photography that I often overlook. The shell was a beautiful object to use as it had shape, texture and mystery about it. The lighting setup was incredibly simple, but by experimenting with the position, intensity and some level of modification I am happy that the five images are very different from one another.
I’ve recently had feedback from my tutor that I needed to look for another level of connection with my work that just the technical. My engineering background makes it very easy for me to consider the cleverness of an image and I’ve always looked at the technical challenge before the artistic. This exercise has taught me the key skill of just looking closely at a subject and looking for an aesthetic that relates to something outside of photographic craft. In order to get a different perspective, I asked some of my friends what they saw.
“An asteroid hurtling through space” (Shell 1)
“Ice Cream” (Shell 1)
“Bird head skull” (Shell 2)
“A finger wrapped around a glowing orb” (Shell 5)
“Warm and Cosy” (Shell 5)
It proves how an image can provoke different feelings and perspectives in the viewer, even when the subject is completely different.
