Introduction
Part 4 of Expressing Your Vision looks in detail at light both natural and artificial, and how it is the most obvious, yet vitally important element in photography. Before understanding how light in the scene impacts how we see the subject or creates our aesthetic vision of what is before us, we need to understand how the camera sees light and how it differs hugely from the human eye. This research post looks at my learning about light measurement prior to starting the course and the pitfalls I’ve encountered in achieving an exposure that represents my intent. I’ve mentioned previously that I have a large collection of film cameras and was encouraged to shoot the medium in order to better understand how photography works at a technical level. Most of my cameras are over 40 years old and as a consequence of their age, have no electronic light meters built in. When presented with what is essentially a mechanical shutter and aperture that is only slightly more sophisticated than a camera obscura, the need to understand light meters becomes a priority. The need to meter for film is further emphasised by the fact that every shot costs money, which nobody looks to waste.
The Eye vs Machine
The first thing to consider is the miracle that is the human eye and its processor, better known as the brain. The eye itself is made up of the sorts of components we are familiar with in photograph; a lens, aperture (pupil) and a light sensor (retina). The retina is actually an extension of the brain itself [1] which creates a high-speed communication channel from the eye to its control system. The arrangement of muscles in the eye structure allow the lens to dynamically adjust focus and the pupil to open and close quickly when the light level changes. The retina has a cone and rod structure [2] that react to differing wavelengths of light, the former sending messages to the brain that are interpreted as colour.
While the eye is incredible, it is the speed of this dynamic adjustment that is the most remarkable of its abilities. If we look at a scene that is both bright and dark, i.e. containing highlight and shadow, the brain makes many adjustments to the pupil in an indistinguishably short timescale that the we don’t even notice. If the eye moves around the scene, the continual adjustment means that we see a perfectly ‘exposed’ scene in its entirety, all of the time.
Now consider the camera. It has an aperture that is either under our control or, in the case of automatic modes, its electronic system. Either way, the aperture is set for a single light level and must be altered by us every time the light level changes. If the scene has a strong mixture of light and dark regions, the aperture will only be ‘appropriate’ for one of them. Modern evaluative meters are able to average the light in scene, but the result is still the same; a single aperture setting. For a given aperture and light sensitivity, the camera can determine the corresponding time for the aperture to be open (the shutter speed) for that setting. However, if the light changes or the camera changes viewpoint, resulting in a different range of light levels, the settings are no longer valid and potentially render an over or underexposed photograph. The final drawback of the camera’s measurement of light is the fact that it is doing this electronically. As the course notes explain, the camera measures reflected light from the subject, which it must refer to a calibration reflectance of mid-grey (18% grey as defined by the Eastman Kodak company).
Reflective Light Metering
All cameras with built-in meters measure reflected light, that is the light reflected towards the camera from the subject, much like the eye/brain combination. The amount of light that is reflected from the subject is dependent on the amount of light falling on it and the reflectance of its surface. If we consider a polished mirror with light falling on it, the reflectance of the surface is very high which means that a large amount of light is reflected. This subject is said to have high luminance. However, if we think of a black cloth, the amount of light reflected is much lower due to its poor reflectance so we have a subject of low luminance. Colours, textures and surface finishes all affect the reflectance of the subject, which means that the camera would need intelligence (as the brain has) about the subject to meter it correctly this way. As the camera’s meter has no intelligence about the subject, it must make a measurement assuming a reflective reference of mid-grey. When it does this, a high reflectance subject becomes darker and a low reflectance subject becomes lighter. For example, if we photograph (in auto or semi-auto mode) a snow scene using our DSLR’s reflective meter, the snow appears grey in the image. This is because the camera measures the high reflectance snow against its reference of mid grey and underexposes. Similarly, if we meter someone’s dark jumper with little else in the scene, the result is an overexposed dark grey jumper. The extent of the under and overexposure is then determined by the amount of light falling on the subject in the first instance.
Placing the Tones
If a reflective meter always measures against the mid-tone reference, where do we need to be metering? A scene or subject won’t necessarily contain an obvious mid-grey to take the measurement from and it’s not always possible to place a ‘grey card’ in the scene to make things easier. Most cameras have an evaluative metering mode, which takes the average across the frame and selects what the camera believes to be the optimum reading for the photograph. An average reading for the whole range of reflectances in the scene is essentially a pseudo mid-tone so, as far as the meter is concerned the measurement is straightforward. However, if we shoot a landscape scene where the lower third of the image is land and the upper two thirds are sky, the evaluative meter is averaging a frame that is dominated by hightlight. In order to correct for this, the camera automatically reduces the exposure for the sky region, which in turn underexposes the land in the lower third. If we move position and make the scene dominated by the land and only have a small regiod of sky, the camera will compensate for the darker region. The effect would be an overexposure of the sky. In short, the evaluative meter is great for scenes without extremes in reflected light, but struggles when presented with a high dynamic-range, complex scenes. An example of this can be seen below.
-
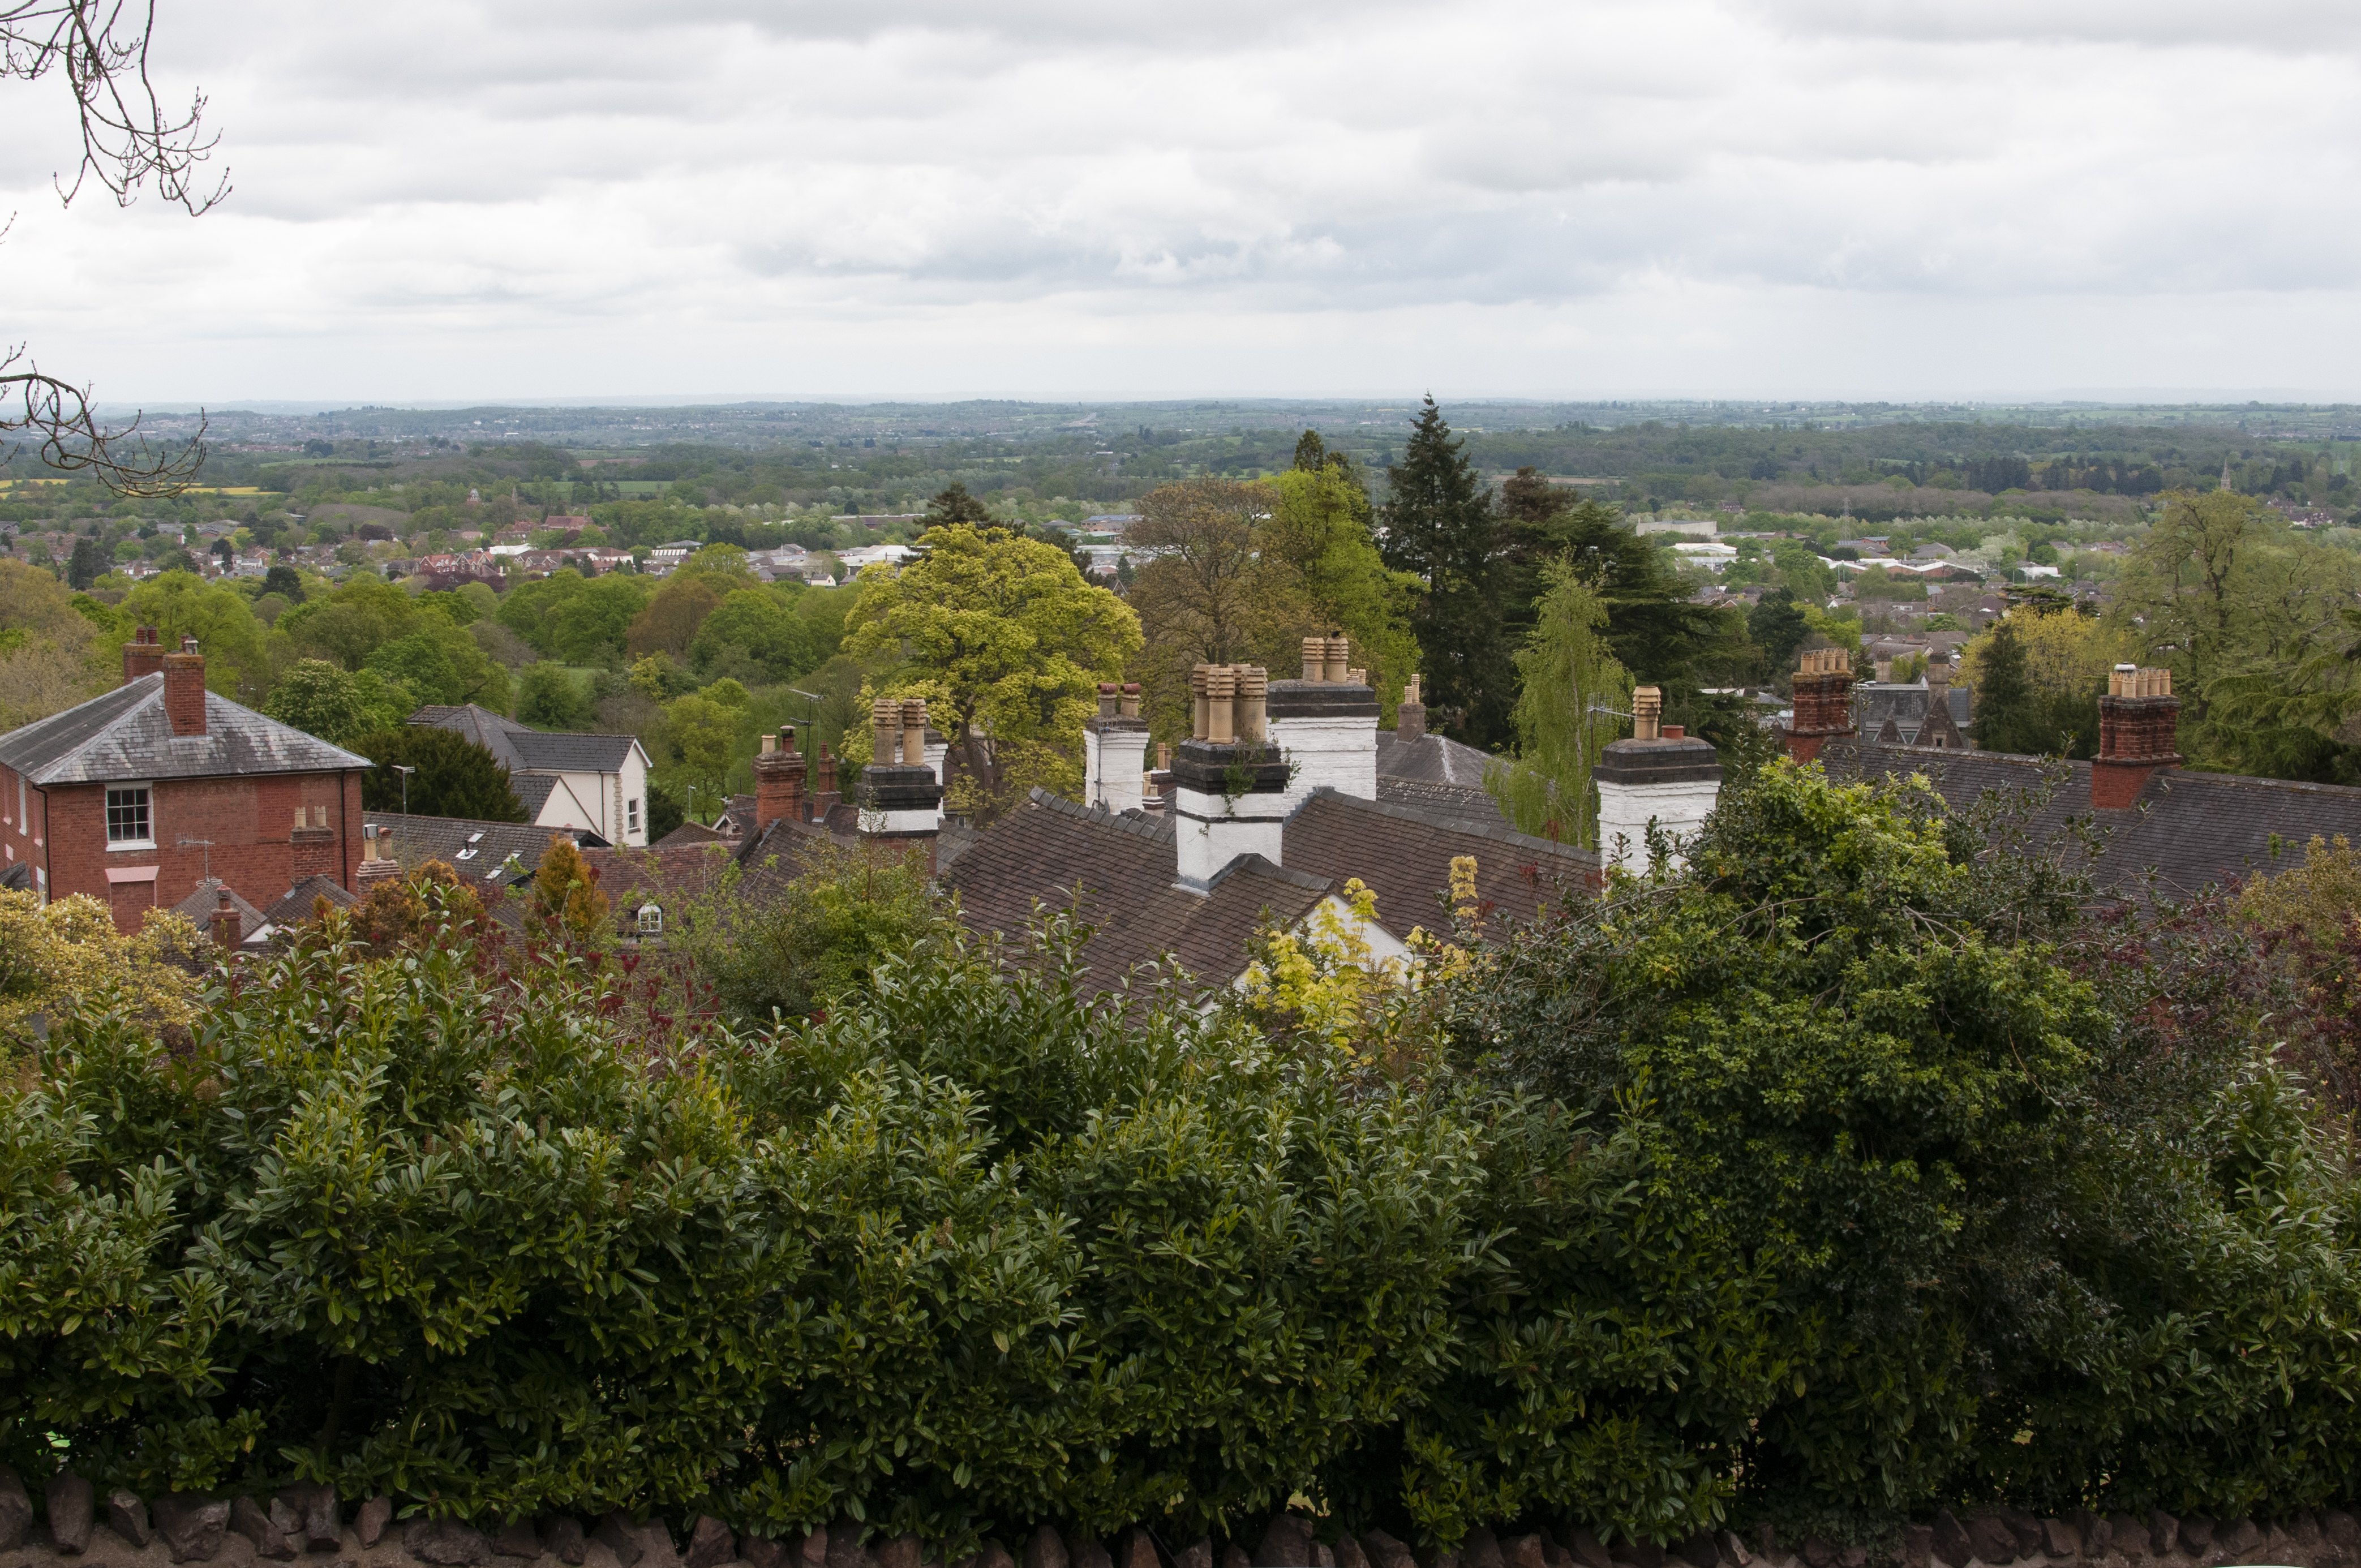
- Photo 1 – 1/200th at f/10, ISO400
-
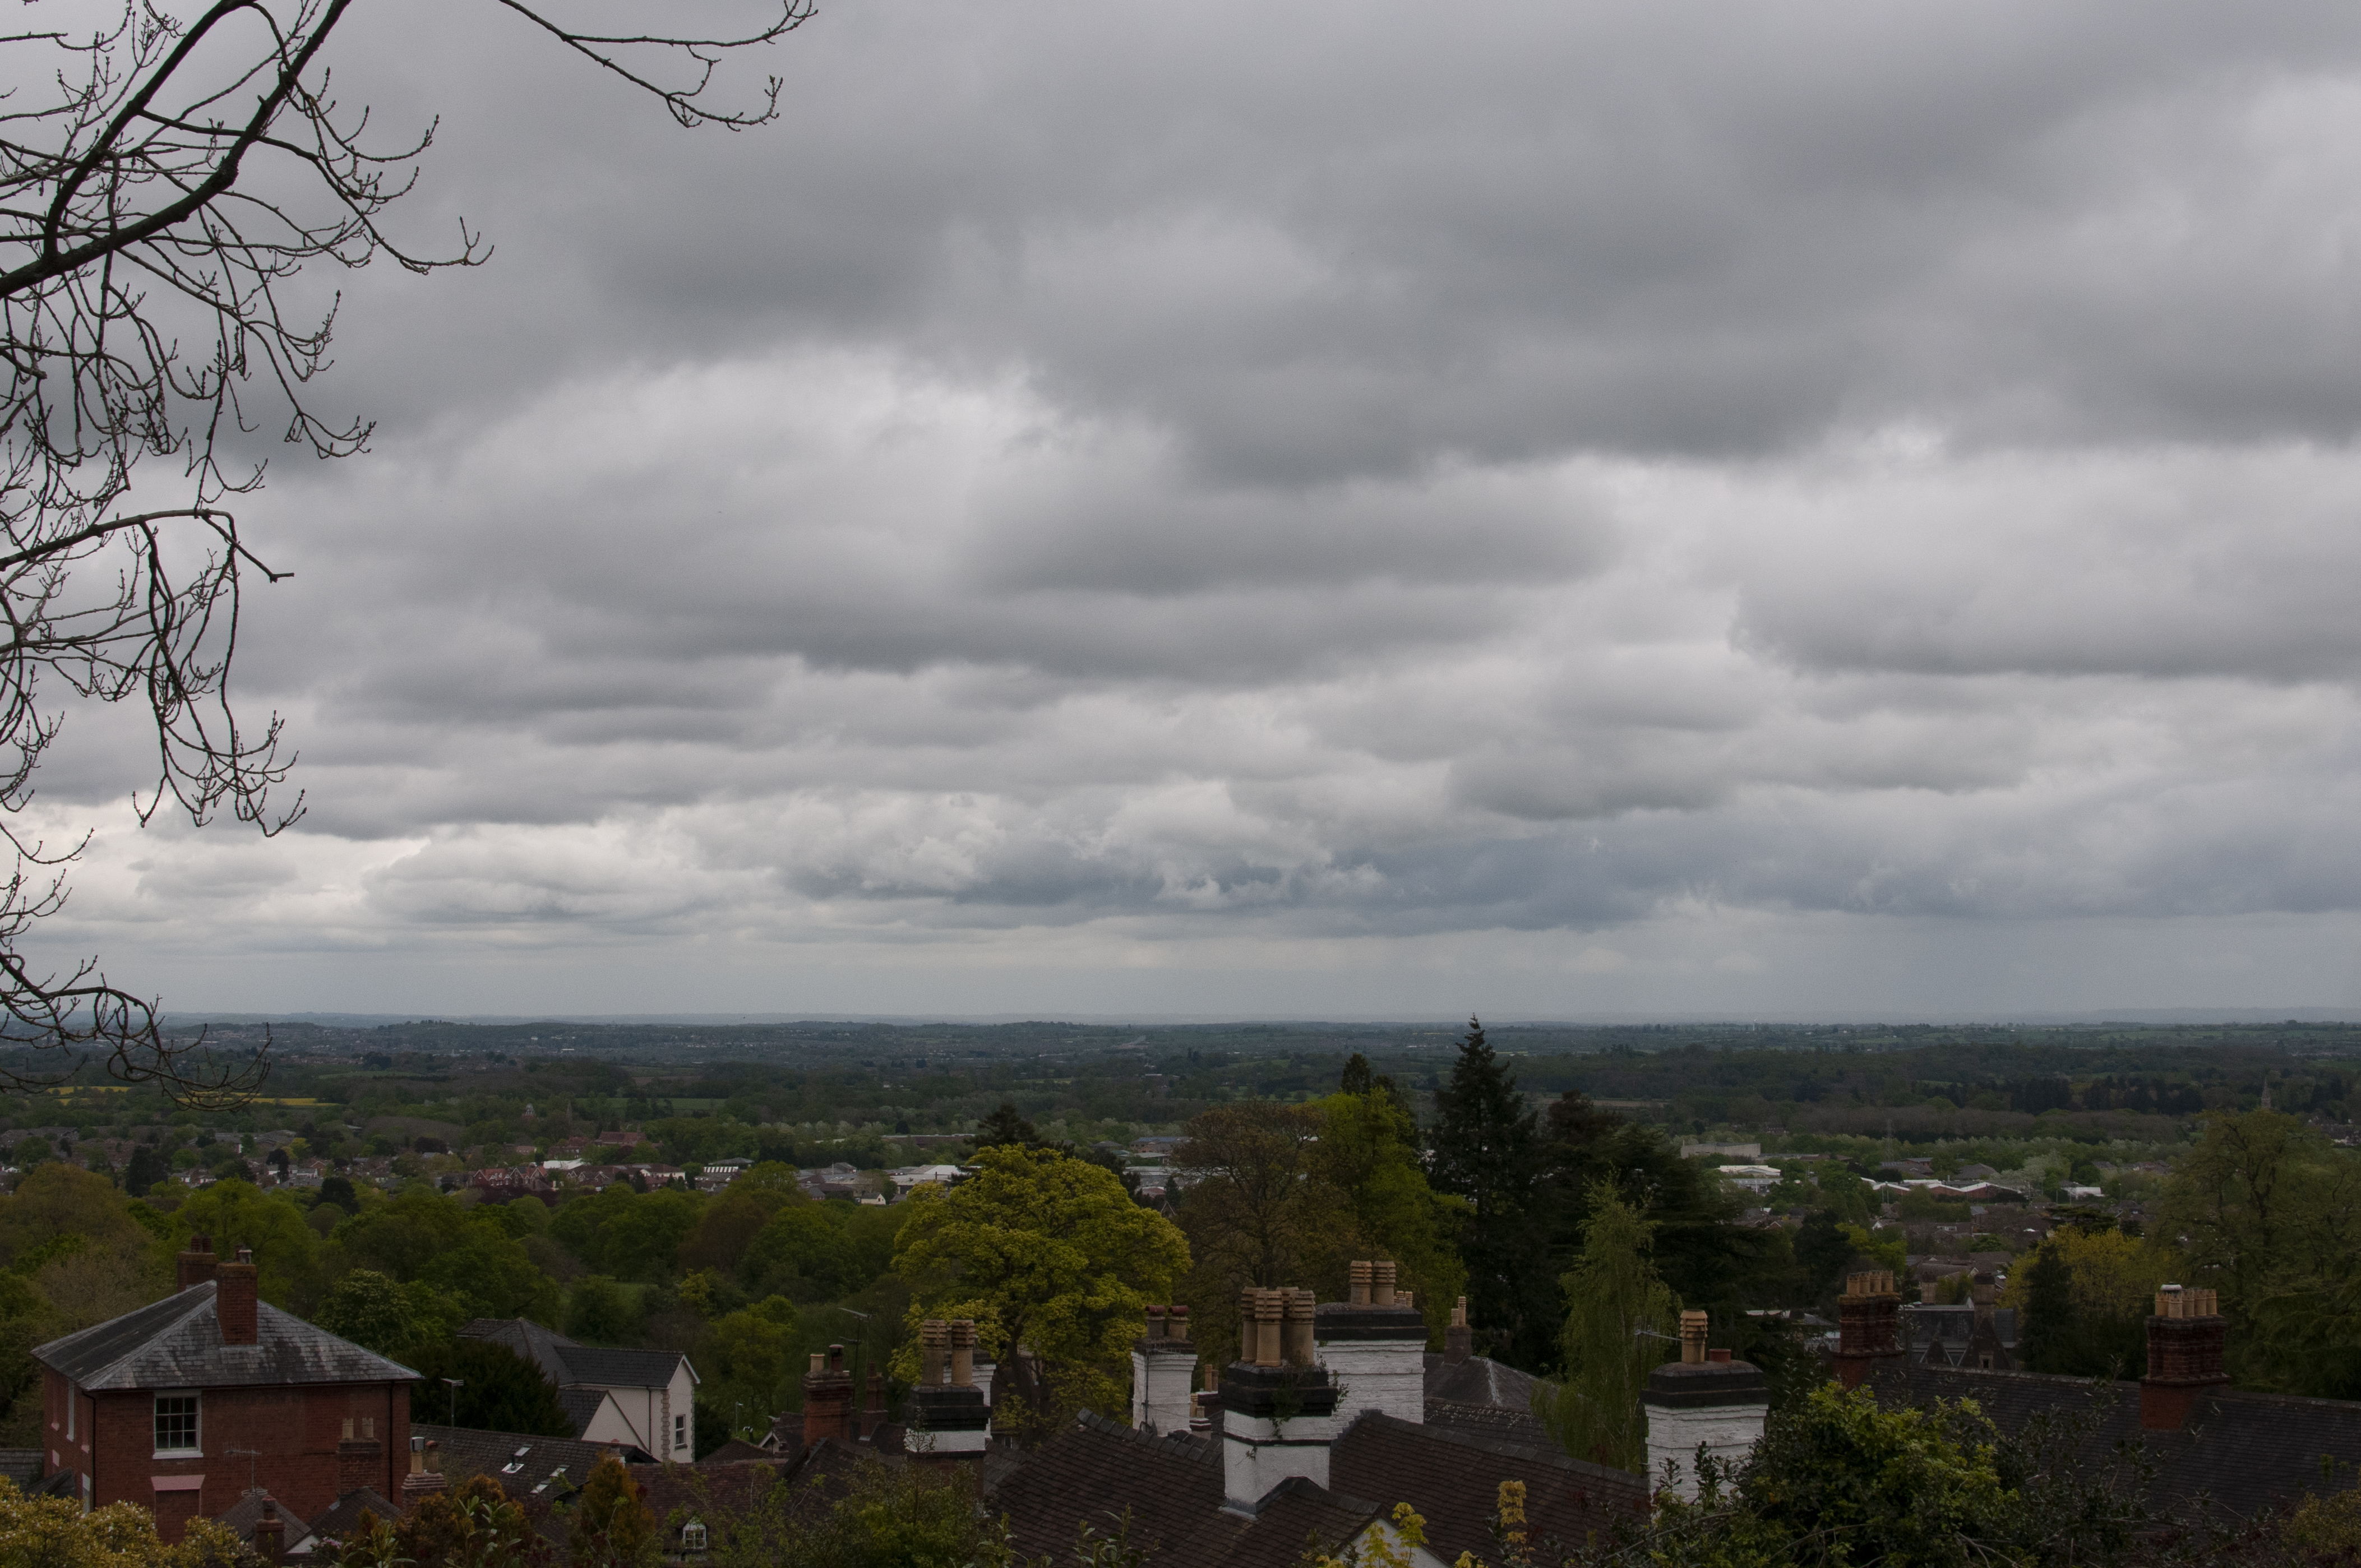
- Photo 2 – 1/640th at f10, ISO400
The two photographs were taken with the camera set to evaluative metering, where the whole scene is averaged. Photo 1 has the rooftops making up most of the image with only a small band of sky a the top of the frame. The result is a well exposed image with the rooftops and trees in balance and a small amount of detail in the sky. However, when point the camera upwards so the sky dominates the frame, the result is very different. This time, the camera has exposed for the sky, which to the eye did have a great amount of cloud detail. The shutter speed in Photo 2 has been increased to 1/640th which is a reduction of approximately 1.5 stops as the camera compensates for the bright sky.
Fortunately, there is a way of placing the tones where we want them to be and it evolved from work by Ansel Adams and Fred Archer in 1940. The Zone System was a practical way of ensuring that regions of highlight and shadow were represented accurately when the film was exposed. The concept was that the dynamic range of light ran from pitch black (Zone 0) to brilliant white (Zone X), with discrete tones in between. Each zone represents a single ‘stop’ of exposure, that is a doubling or halving of light hitting the film or sensor. A graphical representation of the zones can be seen below.
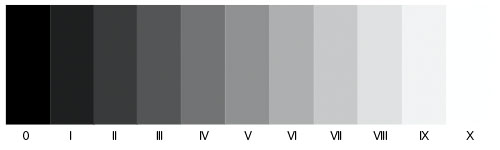
The Zone System (A Adams and F Archer, 1940)
Adams asserted that the relationship between the mid-grey reference used in metering and its corresponding tone in a finished print on ‘normal’ contrast paper, meant that the zone system could be used to both place highlight and shadow in zones as well as see there they naturally fall.
“Since this relationship between the indicated exposure and resulting print value is known and predictable, we use it do define the midpoint of the image-value scale: a middle-gray print value that matches 18 percent reflectance gray card is designated Value V”. Ansel Adams, from his book The Negative
Film development was well understood at this point and the zone system was particularly useful in determining how much control was needed during processing. Development time could now be used to expand or compress the dynamic range of the scene to match the film or paper being used.
Although there is naturally no chemical development in digital photography, the concept of placing metered luminance into zones still applies. We can meter a dark shadow and place it in a zone lower than V by underexposing by the corresponding number of stops, e.g, Zone V to Zone III is two stops under-exposure for the reading. To move from Zone V to Zone VII would be two stops over-exposure.
Incident Light Metering
The other type of light meter is an indecent meter. This time, instead of measuring the reflected light from the subject the meter is placed in the scene itself and measures light falling onto the subject directly. With these measurements, the light that gets back to the camera is still reflected by the subject in the same way as before, this time the camera is set to receive the amount of light illuminating the subject. Favoured by wedding photographers, an incident light reading from a bride in white will result in the true representation of the reflected light from her dress in the camera as opposed to an adjusted exposure in reference to light grey. The main drawbacks of using incident metering is the need to meter within the scene and the position of the meter on the subject to measure the light correctly; place the meter in dark shadow and you’re not getting the light falling on the subject. In addition, it’s not always possible to enter the scene to meter incident light.
When I bought my first film camera, I also had to invest in a light meter. I find that most of the time, I will meter in the same way as my DSLR with a small ‘spot’ measuring reflected light. Whenever I am photographing people, I try to use incident metering to get a more accurate reading for their skin, with all of the shadows and low reflectance areas proportionately in place.
The Exercise
The course notes include a simple exercise to demonstrate how metering in a camera works in auto and semi-auto modes. Step one is to photograph a predominately dark tone filling the frame. Then, repeat with a mid-grey tone and finally a light tone. Compare all three histograms.
For this exercise, I used two pieces of cardboard, one white and one black. I also had a Sekonic mid-grey target which I’ve used for portrait photography previously. I shot all three with an ISO of 800, aperture f/11 in Aperture Priority mode.
-

- White Card

-
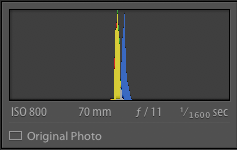
- White Card Histogram
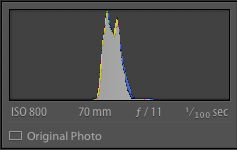
-

- Black Card
-

- Black Card Histogram
-

- Grey Card

-
- Grey Card Histogram
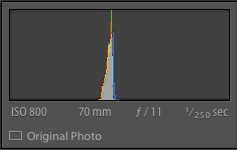
It can be seen from the histograms that the camera does its best to put the exposure in the centre of the camera’s dynamic range, no matter what the reflectance of the material being used. We can tell that the cards are not perfect in their reflectivity as each contains clear colour and shape in the images and their corresponding histograms.
When the camera was presented with the white card, it chose a shutter speed of 1/1600th of a second to set the exposure to mid-grey. The black card caused a change in shutter speed corresponding to 4 stops over-exposure. The grey card resulted in a shutter speed of 1/250th which is in the middle of the two extremes.
The second part of the exercise was to repeat but with the camera on manual and adjusting for an exposure that places the dark and light regions in the correct areas of the histogram, that is toward the left and right respectively. Instead of shooting the same cards, I chose more complex scenes.

Photo 3
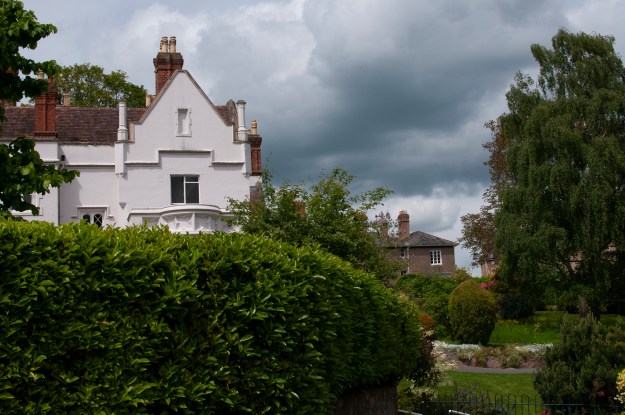
Photo 4
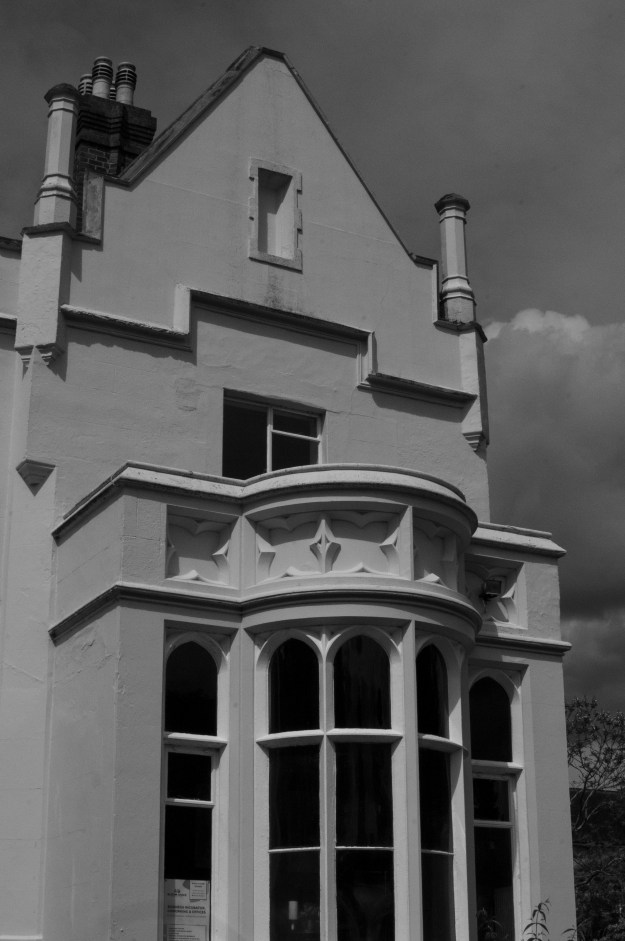
Photo 5
The Images
Photo 3
For this image, I noted the couple on the bench in an area being subtly highlighted by the sun. The weather at the time was fast moving cloud that meant that the light level in the frame fluctuated over a a timeframe of a few 10s of seconds. I chose to photograph the scene to demonstrate how useful the Zone System can be, but also how it’s not the answer to every situation. The couple were only sitting on the bench for a few minutes, long enough to take some selfies as in this shot, so I had to quickly determine a metering setting that would work for when the time and light were right. For this shot, I set the camera to manual, with spot metering. I then metered a region not greatly affected by the changing light, which was the area in shadow under the tree on the left. This put the shadow in Zone 5, so I reduced the exposure by 2 stops and waited for the couple to take their selfie. The resulting image is ‘stable’ as the shadow should always be in its corresponding zone, so everything else in the image is in theory in balance. We can see by the image that the faces and the woman’s hat are perfectly exposed. However, the overall light dynamic range of the scene means that the rest of the frame is a little dark in comparison, even though the shadow under the tree is anchored to Zone 3. For this image, I am happy that the subject stands out but if I wanted to make the image more about the rest of the frame, I would need to add some exposure. What this shows, though is a way of mitigating fluctuating light levels by planning ahead, something that was very important when shooting film.
Photo 4
While in the same park, I noted the highlight and cloud in this image. In the same way, I wanted to preserve the balance of the image, i.e the highlight on the building without losing the cloud detail. This is a scene that matrix metering would struggle with. I metered on the building highlight and increased by 1 stop to Zone 6 to preserve its impact without overexposing. The result is a shot where the subject stands out without losing the other detail.
Photo 3
This final image of the same building was shot in high contrast light. In this case, I wanted to highlight the ornate stonework around the windows and wasn’t particularly interested in the rest of the frame. I metered the shadow on the detailing above the window and reduced exposure by 1 stop to Zone 4. The result is an image where the extreme highlight is brought under control by the shadow placement. The conversion to black and white gives the photograph an infrared feel, which I wasn’t intending but I believe it works.
Conclusion
The electronics in our cameras do what they can to represent the light reflected from the subjects in the frame. The calibration to mid-grey will render an image faithfully if the subject and light are fairly flat. However, with a complex scene comprising highlight and shadow, the camera is unable cope automatically. By using simple placement of the light and dark regions with spot metering , the camera can produce a more faithful image or be used more creatively because of the extra level of control available. I’ve been shooting film for a number of years now, so these principles were already known to me. However, the main lesson here is that metering and exposing will only be as good as the effort put in to getting it right.
References
[1] HealthEngineBlog, 2007, “Vision and the Eye’s Anatomy”, https://healthengine.com.au/info/the-eye-and-vision, accessed May 2019
[2] The Physics Classroom, “Visible Light and the Eye’s Response”, https://www.physicsclassroom.com/class/light/Lesson-2/Visible-Light-and-the-Eye-s-Response, accessed May 2019
