Monthly Archives: Apr 2019

Exercise 3.3 – What Matters is to Look

The Brief

Find a good viewpoint, perhaps fairly high up (an upstairs window might do) where you can see a wide view or panorama. Start by looking at the things closest to you in the foreground.  Then pay attention to the details in the middle distance and the things towards the horizon.  Not try to see the whole view together, from the foreground to the horizon (you can move your eyes).  Include the sky in your observation and try to see the whole visual field together, all in movement.  When you’ve got it, raise your camera and release the shutter. Add the picture and describe the process to your learning log.

My Approach

This exercise reminded me of how I view landscape paintings.  I had read somewhere many years ago that painters incorporated focal points in the scene that they want the eye to look for, in a similar way to photographers using point of focus.  Once this is located, the viewer effectively pulls their ‘vision’ back to see the other elements on the painting reveal themselves.  Over the years I’ve tended to view paintings this way, most recently during a visit to the Metropolitan Museum in New York.  The famous painting  ‘Washington Crossing the Delaware’, by Emanuel Leutze hangs in this museum and its huge scale (6.5 x 3.8 metres) makes it an impressive sight to begin with.

Washington_Crossing_the_Delaware_by_Emanuel_Leutze,_MMA-NYC,_1851

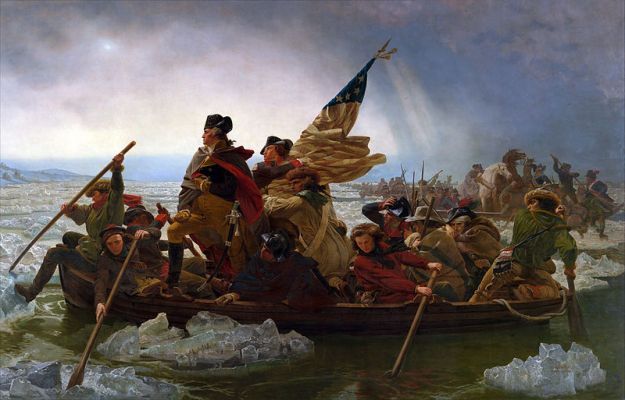
Washington Crossing the Delaware, 1851, Emanuel Leutze (credit: Metropolitan Museum, NY)

The focal point of George Washington standing proudly at the bow of a row boat is clearly what the artist wanted to bring out.  Only when pulling back from Washington, do we see the crew battling with the river, the floating ice ‘growlers’ and the further line of boats stretching to the horizon.  Finally we see the time of day that this is all taking place in.   Although the painting is full of artistic licence and factual inaccuracy, the impact of the painting is still felt in schools and colleges across America owing to the heroism of the founding father and his army.
For this exercise, the inverse has to happen.  We can’t take liberties that Leutze did, but we can carefully observe and wait for the whole scene to present itself.

Location, Viewpoint & Set-Up

For my viewpoint, I chose the top of Church Street in Malvern which has a view down the hill and also toward the other side of the valley created by The Malvern Hills.   I positioned myself with a clear view of the street, but not being in the way of other people as I didn’t know how long I would be standing there.

In order to meet the brief, it was important to ensure that the camera was set up beforehand, so that I could raise and shoot at the right time.   The lens used was a 35mm f/1.4 set to f16 to ensure sharpness throughout the image.   As there was a strong mix of light and dark, I wanted to be able to expose for a middle tone shadow so I set the ISO to 400 to allow for extra ‘speed’ when doing this.   I then spot-metered the scene with the camera in Aperture Priority to get the corresponding shutter speed and finally set the camera to Manual.  I was now able to expose without worrying about the image being underexposed or the camera changing settings, as long as the light didn’t change in the meantime.

My Image

DSC_1996

Church Street, Malvern

In this scene, I started by looking at the foreground lighting, which occupies the lower quarter of the frame.  The junction and map of the town were the entry points into the composition.  When I looked into the frame, I noticed the man in red stretching his leg outside Boots on the left side of the street.  He was doing this for a fair while, so I thought he could be an anchor in the middle of the photograph.  Looking beyond that, I noticed the light is predominantly on the left side of the street, drawing down to where the road curves out of sight.  Beyond the buildings in the far field, we can see the valley out towards the distant hills at Bredon and the blue sky with only a few clouds.

I maintained this view for around a minute and looked around the scene for activities in the foreground, middle ground and horizon.  I shot this moment because I could see the man entering the frame with the pram on the right.

When I looked at the image again on the computer, the man in red and the pram were present as expected.  I had been aware of the couple crossing the street, but the car in the middle of the scene was something I didn’t see.  The driver is looking for a parking space, which is very difficult in this town, particularly on Church Street.  The other element that I didn’t ‘see’ when looking around the scene was the telephone wire running from left to right in the foreground.

Conclusion

This exercise has taught me that although photography cannot play with the factual realism of a scene in the way that landscape painters like Leutze could, it can pull the seen and unseen elements of an image together starting with the focal points in a similar fashion.  On reflection, my image has the depth afforded by the leading line of Church Street and the uninterrupted view to the hills across the valley.  As a composition, it doesn’t really obey any other rules such as ‘thirds’ or ‘symmetry’, but in my view that isn’t important.  What is important is that by waiting and looking throughout the scene, I was able to reveal some details of a Friday afternoon in a small countryside town.  If I had looked more closely, I would have perhaps seen the elements that I missed but I conclude that this is a balance of timing; seeing the general movements but capturing a specific set.


Exercise 3.2: Trace

The Brief

Start doing your own research into some of the artists discussed above.  Then, using slow shutter speeds, ,multiple exposure function, or another technique inspired by the examples above, try to record the trace of movement within the frame.  You can be as experimental as you like.  Add a selection of shots together with relevant shooting data and description of process (how you captured the shots) to your learning log.

My inspiration

Prior to starting part 3, I had already become familiar with the use of shutter speed to record or freeze time.  Over the past few years, my two most common types of photography have been shooting sporting events and landscape.  In the former, the freezing of time is generally used to show the action, where a technique commonly used in the latter incorporates capturing movement of clouds, water etc through the use of slow shutter speeds.  What I learned in part 3 was that the movement within the frame is the third dimension to the image, whether it is time between events or simply relative movement between the camera or the subject.  The impression of speed of the subject can be created by using a slow speed to capture motion blur, while the same effect can be used to express chaos and panic by capturing the camera movement.  In an artistic sense, it doesn’t matter which tool is used to create the effect as long as the photograph works.  My research into the decisive moment (Project 3) led me to examine the works of highly creative artists such as Aïm Deüelle Lüski, who uses both long and multiple exposures combined to produce ethereal, semi-realistic images with the camera as part of the scene.  As a film shooter, I was also aware of the classic technique of multiple short exposure of single frames of film to create the effect of a long exposure, the motivation being to retain texture and avoid issues with reciprocity failure of slow films.

Last year, I purchases a long focal length macro lens for my D4.  At 200mm, it offers both the very short focus distance and telephoto magnification, which has allowed me to capture very small subjects such as bees with high precision.  I’ve grown to love the details this lens reveals, so my starting point for this exercise was small movement in the frame.

The images

The E String (3s at f/40, ISO 800)

This first image was inspired by my renewed interest in the guitar and the memory of a late friend once trying to teach me, to no avail.  I borrowed an electric 6 string guitar from a colleague so that I could capture the tiny movements in a string when it is plucked; in this case, the E string.  My first attempt at this shot was ruined by my being too heavy-handed with the string.  The vibrations induced into the rest of the guitar made all of the strings move.  Eventually, my plucking of the string was gentle enough to keep everything else still.   I used a continuous LED light from the left of the frame to light the strings and pickup.

Vinyl Queen (composite of  6 frames all 1/400th at f4.8, ISO6400)

This image was inspired by my recent rediscovery of vinyl records and of the band Queen, following the recent film biopic Bohemian Rhapsody.  I started listening to vinyl again because of the tactile nature of the medium, which has been lost in the digital era. For this image, I shot the record label with the camera on a tripod and the shutter release set to High Speed Continuous.  With the same LED light at 45 degrees from the lens, I shot 6 frames as the turntable rotated.  In Photoshop, I combined the images as layers with increasing opacity up to the final frame.  This is essentially the equivalent to shooting multiple exposures of a single frame as one would in film, the key difference being that there is always only one photograph in that medium.  As I’ve progressed as a photographer, I’ve moved away from using digital manipulation in Photoshop and Lightroom.  However, the effect is what I was looking for and as the man said:

“The negative is the score, and the print is the performance.” – Ansel Adams

View from the Deck (GoPro at 30fps, combined in Photoshop)

For my final shot, I was inspired by the works of Lüski   I placed a GoPro camera on the turntable of my record player, facing outwards.  With the camera set to 30pfs burst photo mode, I rotated the turntable and shot a 360 degree panorama of the room.  I used the same process of layering different opacity frames in Photoshop to create one image.

Reflection

I enjoyed shooting for this exercise as I was able to try three different techniques to capture movement within the frame.  The first image showcases macro photography and in particular how it reveals detail that the eye struggles to see.  The use of traditional slow shutter speed captures the difference between the strings well and the composition is clearly of a guitar pickup and fret board.  The second image is more technical, post-processing than photography, but it is a variation of a classical approach to slow speed film photography.  I like the way that the text is still legible this way, as with simple long exposure the effect is not as easily achieved.   The final image was my tribute to Lüski.  I loved the concept of the camera being part of the image rather than a tool for capturing what’s in front of it.  In this image, we can see all of the elements that make up the scene, from the record player’s tonearm and bright green cartridge to the ceiling cornicing, sofas and even my camera on its tripod.  The camera appears twice as it is also reflected from the inside of the record-player’s perspex lid.   I love the way that the only stationary element is the turntable mat in front of the camera and the way that the finished image is lo-fi, in a similar way to Lüski’s pinhole shots.